
Slicked Back Natural Hair: A Guide To Styling The Sleek Bun
Written by Baby Tress Marketing
The sleek and polished bun that has taken over hair care routines leading up to wash day, dates back to the 1920s when icons like Josephine Baker appeared on the scene in finger waves. Large swoops and shiny swirls were used as a way to soften and glamourize the short straight bob hairstyles that were on the rise at the time. Fast forward to the 80s, 90s, and 2000s, sleek styles took on a modernized twist, the form of intricate updos mixed with braids and hair designs that we all know and love.
As our hairstyles evolved and generations became more innovative (thanks to Annie Turnbo Malone and Madam CJ Walker), one thing remains constant: the love for slick hairstyles. Now that we have reached a peak of unapologetic self-expression and unwavering creativity, laying our edges is no longer a requirement and exists as an optional design element. Regardless of the era, our hair remains a small but powerful symbol whether it is smooth and styled or free and hanging naturally. If you’re looking for a way to keep your tresses out of your face or simply want to try something new, keep scrolling to find out how to achieve a slick bun.
What You’ll Need:
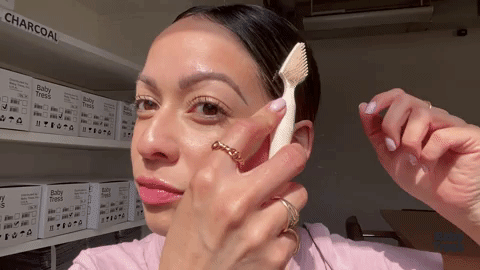
- Baby Tress Edge Styler®
- Comb
- Hair ties
- Spray Bottle
- Bristle Brush
- Edge control/hair gel of your choice
- Bobby Pins (optional)
- Silk Scarf (optional)
Step 1:
Before you begin styling, decide if you would like your bun to have a side or middle part or if you’d rather slick your hair back completely. Once parted and detangled, dampen your hair using a spray bottle to add a bit of moisture before using products and styling. The water will make the hair easier to manipulate and ultimately slick down.

Step 2:
Take a generous amount of your favorite edge control and apply evenly to the front and sides of your hair. Don’t be afraid to add secondary products, like a spritz or mousse, to ensure that your hair remains secure all day. As your hair begins to take shape and lay in the direction of the forming bun, run your fingers through any bumps.

Step 3
Take your round bristle brush and smooth out your hair from roots to tips, following the direction that you would like your bun to be positioned. Apply more product as needed. While you brush, gather and grip smaller sections of hair until you are holding all of your hair in one hand.

Step 4
Secure your hair in place using a hair tie. Use the palm of your hand to smooth down any frizz or flyaways. If you find any stray pieces or bumps, use as many bobby pins as you need to create a flawless finish.

Step 5
Grab your 3-in-1 Edge Styler® and use the comb to separate your edges and face-framing pieces from the slicked portion of your hair. Apply edge control to the natural boar bristles and create your swoops and swirls. If you have the time, tie your hair down with a satin scarf to lock and seal.
Leave any tips and tricks for your slick buns in the comments and then sign up for The Swoop newsletter to get 15% off your first BabyTress.com purchase!


